Program Setups
The Program Setups allow users to configure a wide range of asset and program-related details essential for system operations. It includes the following tabs: Asset Catalogue, which manages the make, model and trim details of various assets; Asset Condition, where users can define conditions like new, used or average; Asset Usage, which records the intended use of assets, such as commercial or non-commercial; Annual Mileage, used to define mileage ranges; Term, which helps configure term ranges for loans; Credit Score, to set up credit score parameters; Financed Amount, for configuring ranges of financed amounts; and Business Unit, used to define and manage business units. This comprehensive setup ensures accurate configuration of asset-related data, which is crucial for seamless operations.

Program Setups
Asset Catalogue
The Asset Catalogue section is designed to record and manage the essential details of assets, including Make, Model and Trim, along with their associated Description, Code and Status. This feature ensures that all asset information is organized and accessible, facilitating effective asset tracking and maintenance throughout the system.

Add New Asset Make
To manage asset details in the Asset Catalogue, follow these steps:
- Add New Make: Use this option to add a new make for an asset. The system ensures that no duplicate make can be added.
- Input Make: Enter the name of the make for the asset.
- Input Description: Provide a description for the respective make, model or trim of the asset to give additional clarity.
- Input Code: Assign a unique code to the asset’s make, model or trim. This code acts as a reference for future use and must be unique for each record.
- Select Status: Choose whether the record is Enabled or Disabled. Enabled records will be active and available for use, while disabled records will no longer be accessible in future operations.
- Managing Existing Records: Added records are displayed in a hierarchical tree structure, representing the Make, Model and Trim of each asset. Each entry has its own row, allowing users to independently View, Edit, Delete or Add new records. Users can filter records using the Search Bar available at the top of each column.
 Asset Catalogue
 - Add New Make/Model/Trim: Use these options to add new records for each specific category. While adding/editing a Trim user can also Upload Image for the same.
- Download Template/Upload File: Users can download a pre-defined template or upload files to bulk upload asset catalogue records.

Asset Catalogue Download Template/Upload File
Asset Condition
The Asset Condition tab helps users record and manage the condition of various assets, such as excellent, average, poor, new or used. The interface includes fields for Code, Description and Status, ensuring that asset conditions are clearly documented and easy to manage.

Add New Asset Condition To manage asset conditions, follow these steps:
- Add New Asset Condition: Click this button to add a new asset condition.
- Input Code: Enter a unique code assigned to the asset condition. Each code is specific to the record and can be referenced as needed.
- Input Description: Provide a description of the asset condition, such as excellent, average, poor, new or used.
- Select Status: Choose whether the asset condition is Enabled or Disabled. Enabled conditions will be available for use, while disabled ones will no longer be accessible.
- Managing Existing Records: Already added asset conditions are displayed in a tabular format. Use the Search Bar at the top to filter records based on search criteria. The ellipsis menu on the right side of each record allows users to Edit or Delete the respective asset condition.

Asset Condition
Asset Usage
The Asset Usage section allows users to record and manage details about how assets are utilized, such as for commercial or non-commercial purposes. The interface includes columns for Code, Description and Status, ensuring that asset usages are accurately documented and tracked. This feature helps users maintain clarity on the intended use of each asset, facilitating efficient management and reporting.

Add New Asset Usage
To manage asset usage, follow these steps:
- Add New Asset Usage: Click this button to create a new asset usage record.
- Input Code: Enter a unique code for the asset usage. Each code is distinct for each record and can be used for reference whenever required.
- Input Description: Provide a description of the asset usage, such as commercial or non-commercial purposes.
- Select Status: Choose whether the asset usage is Enabled or Disabled. Enabled usages will be available for further use, while disabled ones will no longer be accessible.
- Managing Existing Records: Existing asset usage records are displayed in a table format. Use the Search Bar at the top to filter records based on search criteria. An ellipsis menu next to each record allows users to Edit or Delete the respective asset usage.

Asset Usage
Annual Mileage
The Annual Mileage section is used to define mileage ranges that can be applied to various business rules, such as interest rate calculations. These ranges, such as 01 km/mile to 999 km/mile or 1000 km/mile to 9999 km/mile, are vital for maintaining accurate records in the system. The window includes columns for Annual Mileage From, Annual Mileage To and Status, allowing for clear documentation and easy reference.

Add New Annual Mileage
To manage annual mileage ranges, follow these steps:
- Add New Annual Mileage: Click this button to create a new mileage range. Ensure that no overlapping range is defined.
- Input Annual Mileage From: Enter the starting point of the mileage range (e.g., 01 km/mile).
- Input Annual Mileage To: Enter the end point of the mileage range (e.g., 999 km/mile).
- Select Option Status: Choose between Enabled or Disabled for the mileage range. Enabled records will be available for use, while disabled records will be inactive.
- Managing Existing Records: Already added annual mileage records are displayed in a tabular form. Use the Search Bar at the top to filter the records. An ellipsis menu is available on the right side of each record to Edit/Delete the respective annual mileage range.

Annual Mileage
Term
The Term tab is used to define ranges for terms, such as 1 month to 12 months and is an important factor when setting up charts in Index. The window provides columns for Term From, Term To and Status, helping users manage term ranges effectively.

Add New Term.
To manage term ranges, follow these steps:
- Add New Term is used to add a new term range. Note that users cannot define a term range that overlaps with an existing range.
- Input Term From: Enter the starting point of the term range.
- Input Term To: Enter the ending point of the term range.
- Select Status: Choose Enabled for active terms or Disabled for inactive ones. Only enabled terms will be available for use in the future.
- Managing Existing Records: Existing term records are displayed in tabular form. You can use the search bar at the top of each column to filter records based on specific criteria. An ellipsis menu is provided next to each record, allowing you to Edit/Delete the respective term range.

Term
Credit Score
The Credit Score tab is used to define and manage credit score ranges, which are essential for use in charts and deal creation in the Deal Builder feature. Users can define different credit ratings, such as poor, fair, good, very good and exceptional, by specifying credit score ranges. The window includes columns for Description, Credit Score Range and Status, ensuring accurate setup and organization of credit score data.

Add New Credit Score
To manage credit score ranges, follow these steps:
- Add New Credit Score is used to add a new credit score range. Note that users cannot define a range that overlaps with an existing credit score range.
- Input Credit Score From: Enter the starting point of the credit score range.
- Input Credit Score To: Enter the ending point of the credit score range.
- Input Description: Provide a name or description for the credit score range, such as poor, fair, good, very good or exceptional, based on the defined range.
- Select Status: Choose Enabled for active credit score ranges or Disabled for inactive ones. Only enabled records will be available for future use.
- Managing Existing Records: Already added credit score records are displayed in a tabular form. Use the Search Bar at the top of each column to filter records based on specific criteria. An ellipsis menu is provided on the right side of each record, allowing you to Edit/Delete the respective credit score range.

Credit Score
Financed Amount
The Financed Amount section is used to configure ranges of financed amounts that serve as business criteria in various charts. For instance, financed amount ranges can be set from 1 to 500, from 501 to 1000 and so on. The window includes columns for Financed Amount From, Financed Amount To and Status, ensuring that financed amounts are properly set up and managed for evaluation within the system.

Add New Financed Amount
To manage financed amounts, follow these steps:
- Add New Financed Amount Range: Use this option to add a new financed amount range.
- Input Financed Amount From: Enter the starting value for the financed amount range.
- Input Financed Amount To: Enter the ending value for the financed amount range.
- Select Option Status: Choose whether the record is Enabled or Disabled. Enabled records will be available for future use, while disabled records will not.
- Managing Existing Records: Financed amount records that have already been added are displayed in a tabular form. A Search Bar is provided at the top of each column to filter records based on search criteria. An ellipsis menu is available on the right side of each record to Edit/Delete the respective financed amount range.

Financed Amount
Business Unit
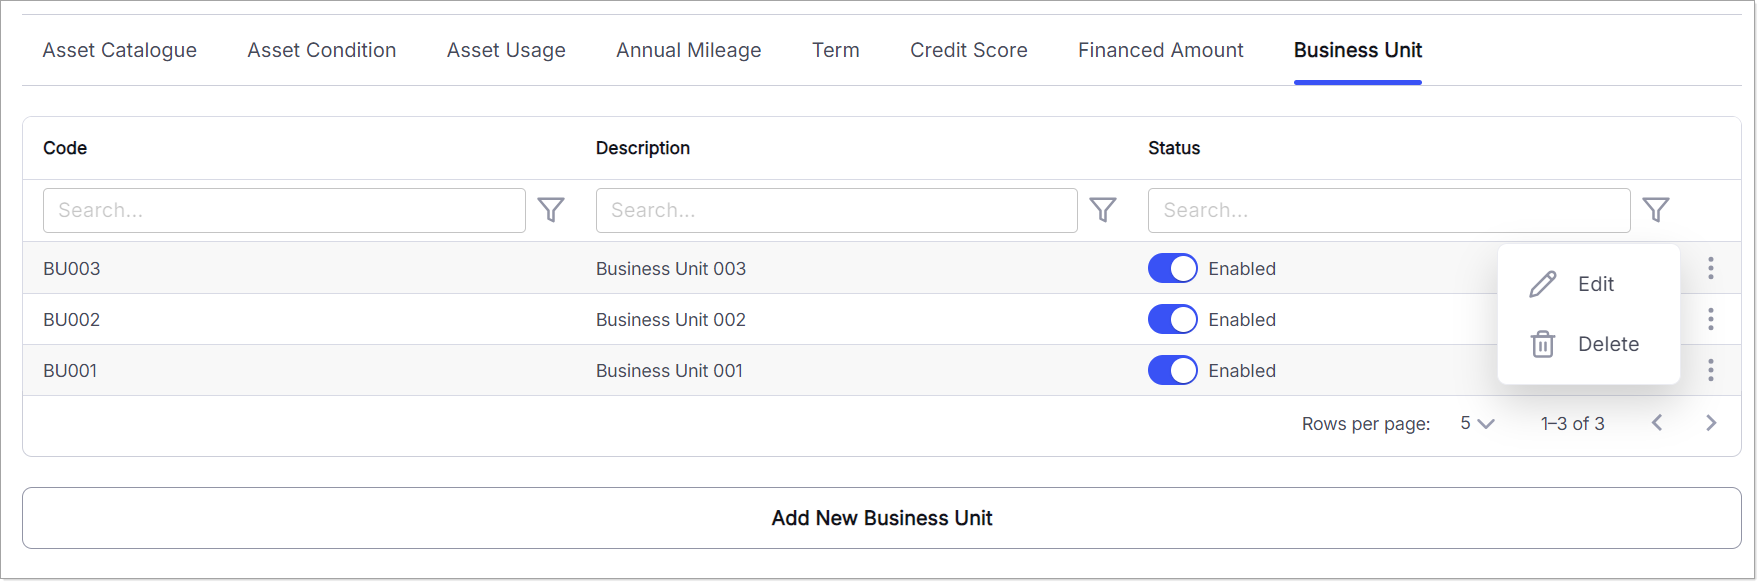
The Business Unit section allows users to define and manage business units that are available as optional multi-select business criteria in interest rate charts. Once defined, these business units appear in drop-down lists throughout the system wherever applicable. This setup helps users record and manage the Code, Description and Status of each business unit, ensuring flexible and comprehensive control over business unit settings.

Add New Business Unit
To manage business units, follow these steps:
- Add New Business Unit: Click this option to add a new business unit. It is important to ensure that the Code is unique and does not overlap with any existing business unit code.
- Input Code: Enter a unique code that will be assigned to the business unit. This code will be used as a reference for the respective business unit where needed.
- Input Description: Provide a descriptive name for the business unit, such as “Unit 1” or “Unit 2.”
- Select Option Status: Choose the status of the business unit. Records with Status Enabled will be available for future use, while records with Status Disabled will no longer be available for future operations.
- Managing Existing Records: All previously added business unit records are displayed in tabular form. A Search Bar is available at the top of each column to filter the records based on search criteria. An ellipsis menu is provided on the right side of each record, allowing users to Edit/Delete the respective business unit.
Business Unit