Deal Setups
Deal Setups provide users with a streamlined approach to managing essential configurations related to deals, now featuring additional tabs for greater functionality. These include Contract Annual Mileage, Contract Term, Fees, Business Trading Age, F&I Marketing Materials and Rebates. The Contract Annual Mileage tab allows you to define allowable mileage per year for contracts, ensuring compliance with company policies. The Contract Term tab helps configure contract lengths that can be applied across various dealer systems. The Fees tab enables the management of various fees associated with deals, while the Business Trading Age tab allows you to specify acceptable trading age ranges for businesses. The F&I Marketing Materials tab provides a platform to upload and manage marketing materials related to Finance and Insurance (F&I) products, making them easily accessible for dealers. The Rebates tab enables users to define and manage rebates that can be applied to deals, offering greater flexibility in pricing strategies. This centralized and expanded setup ensures efficiency and consistency in managing deal-related configurations.

Deal Setups
Contract Annual Mileage
The Contract Annual Mileage tab is used to configure the allowed annual mileage for contracts within the system. These values are stored in the backend and are available as parameters while creating or configuring a quotation. The tab provides fields for Code, Value and Status, ensuring that all contract mileage options are correctly configured and easily managed.

Add New Contract Annual Mileage
To manage Contract Annual Mileage, follow these steps:
- Add New Contract Annual Mileage: Click this button to add a new annual mileage option to the system.
- Input Code: Enter a unique code for the contract annual mileage. This code will be used as a reference for this specific record.
- Input Value: Input the annual mileage value associated with the contract.
- Select Status: Select whether the contract annual mileage is Enabled or Disabled. Enabled records will be available for use, while disabled records will not.
- Managing Existing Records: Already added contract annual mileage records are displayed in a tabular format. A Search Bar is available at the top of each column to filter records based on search criteria. Use the ellipsis menu next to each record to Edit or Delete the respective contract annual mileage.

Contract Annual Mileage
Contract Term
The Contract Term screen allows users to configure and manage contract term options in the system. These configurations are saved in the backend and are available for selection as quotation parameters when creating or editing quotations. The screen includes columns for Code, Value, Finance Type(s) and Status, ensuring clear and precise management of contract terms.

Add New Contract Term
To manage Contract Terms, follow these steps:
- Add New Contract Term: Click this button to add a new contract term.
- Input Code: Enter a unique code for the contract term. This code will be used to identify the record and can serve as a reference point during the quotation process.
- Input Value: Input the value for the respective contract term. For example, a contract term value of 12 months can be associated with the code CT001, which will be available as a selection option when creating a quotation.
- Select Finance Type(s): Choose one or more finance types (e.g., Finance, Lease) from the drop-down list to associate with the contract term.
- Select Status: Choose whether the contract term is Enabled or Disabled. Enabled records will be active and selectable for use, while disabled records will no longer be available.
- Managing Existing Records: Contract term records that have already been added are displayed in a tabular format. A Search Bar is provided at the top of each column to filter records based on specific criteria. An ellipsis menu is available next to each record for users to Edit or Delete the respective contract term.

Contract Term
Fees
The Fees section allows users to configure and manage various fees within the system. This includes viewing, adding, editing and deleting fees, ensuring comprehensive fee management. Fees can represent any charge, such as processing fees or documentation fees, which are essential for different operations within the system. The window includes columns for Code, Fee Name and Status to help users organize and manage fee records efficiently.

Add New Fees
To manage Fees:
- Add New Fee: Click this button to Add New Fee. Note that fee codes must be unique and users cannot assign a fee code that overlaps with an existing code.
- Input Code: Enter the unique code assigned to the respective fee. This code is specific to each record and can be referenced as needed for system operations.
- Input Name: Enter the name of the fee. For example, fees can include processing fees, fees for non-tax payers or fees for tax payers.
- Select Status: Records with Status Enabled will be available for future use, while records with Status Disabled will no longer be accessible for future operations.
- Managing Existing Records: Already added fee records are displayed in a tabular form. A Search Bar is available at the top of each column to filter records based on search criteria. An ellipsis menu is provided on the right side of each record to Edit/Delete the respective fee.

Fees
Business Trading Age
The Business Trading Age section allows users to configure and manage different business trading age ranges in either months or years. This feature enables users to add, edit, view and delete trading age ranges, ensuring accurate management within the system. Business trading age ranges can represent various time periods, such as 1 to 3 years or 4 to 5 years, depending on requirements. The window includes columns for Age From, Age To and Status, providing a structured approach to managing business trading age records.
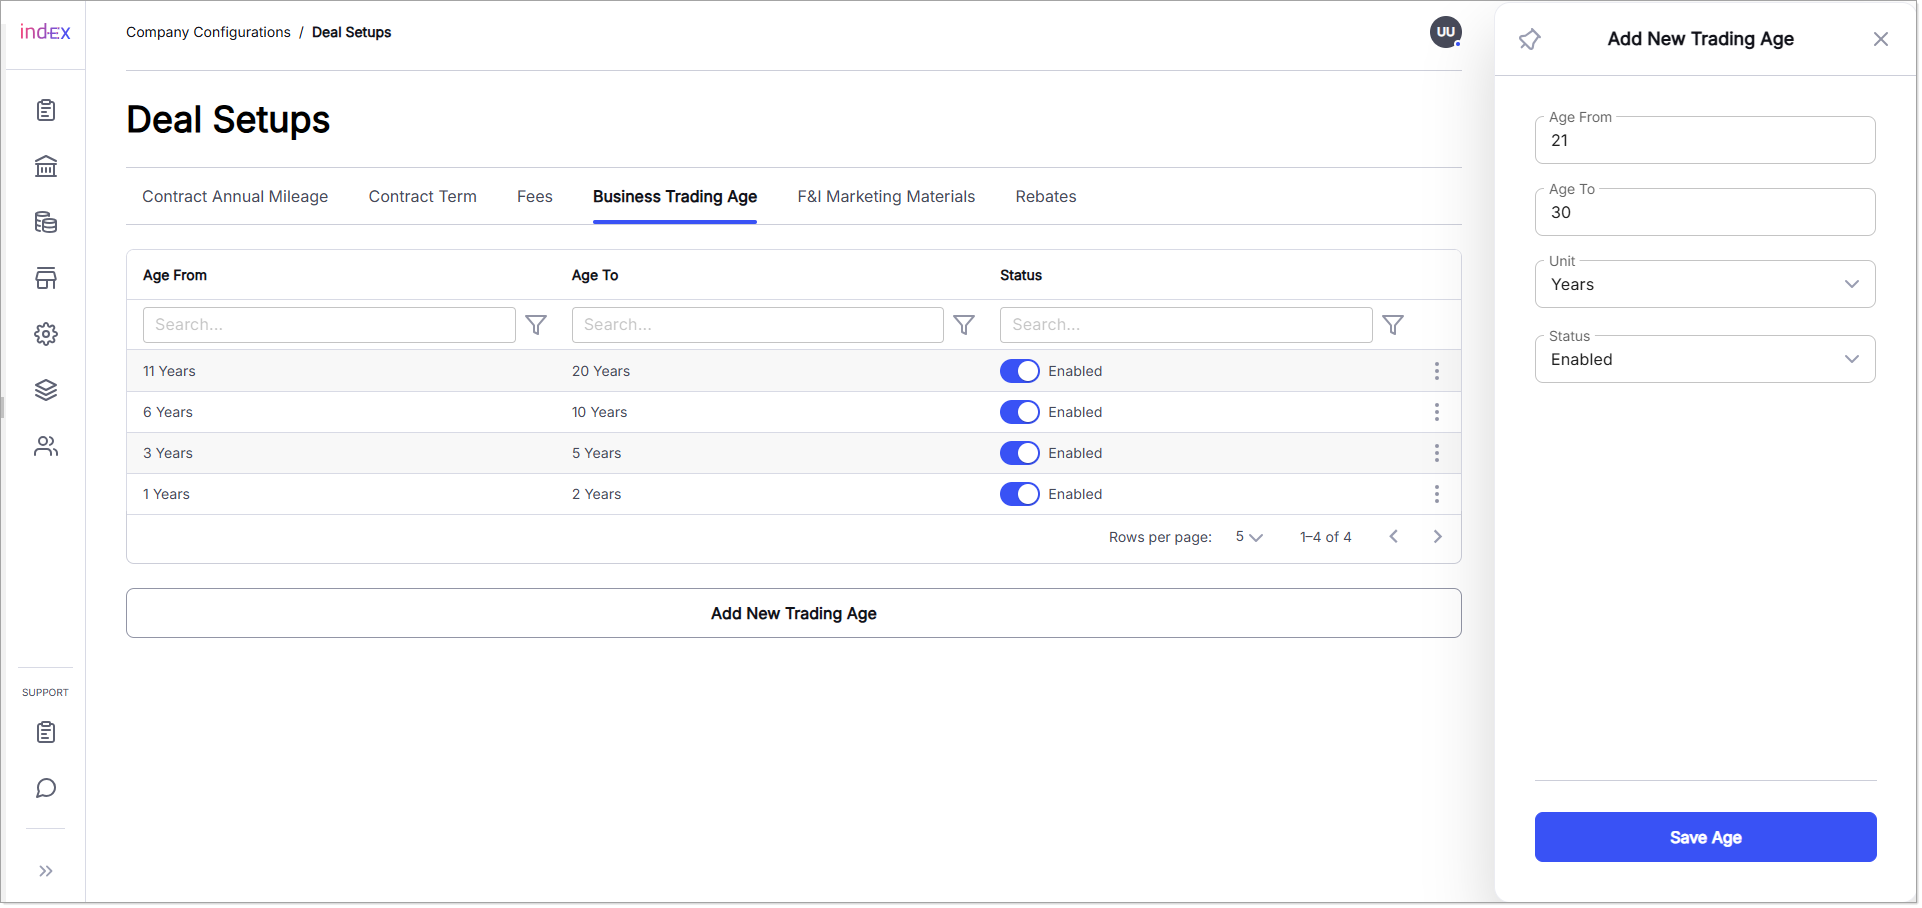
Add New Business Trading Age
To manage Business Trading Age, follow these steps:
- Add New Trading Age: Click this button to add a new business trading age.
- Input Age From: Enter the starting numeric value for the business trading age range (e.g., 1, 2, 3…).
- Input Age To: Enter the ending numeric value for the business trading age range (e.g., 1, 2, 3…).
- Select Unit: Choose either Months or Years from the dropdown list to specify the unit of time for the trading age range.
- Select Status: Choose whether the business trading age is Enabled or Disabled. Records with Enabled status will be active and available for selection, while Disabled records will be inactive and hidden from future use.
- Managing Existing Records: Business trading age records that have already been added are displayed in a tabular format. A Search Bar is available at the top of each column to filter records based on specific criteria. An ellipsis menu is located on the right side of each record, allowing users to Edit or Delete the respective business trading age.

Business Trading Age
F&I Marketing Materials
The F&I Marketing Materials tab allows users to configure and manage F&I marketing materials within the system, including adding, editing, viewing, and deleting records. These materials represent various F&I products, such as wear and tear protection, lease-end protection, and warranties. The interface includes columns for Provider, Provider Code, Product Type, Product Name, Description, Status, and associated media to help organize and manage records efficiently.

Add New F&I Marketing Materials
To manage F&I Marketing Materials:
- Add New Material: Click the button to add a new F&I Marketing Material.
- Input Provider Code: Enter the unique code assigned to the respective F&I product provider for identification purposes.
- Select Product Type: Choose a product type from the dropdown list associated with the selected provider.
- Select Product Name: Choose a product name from the dropdown list populated based on the selected product type.
- Input Description: Provide a description of the F&I product for marketing purposes.
- Upload Product Image: Drag and drop an image or browse to upload a visual representation of the F&I product.
- Input Video URL (Optional): Add a URL linking to a video showcasing the F&I product, if available.
- Input Brochure URL (Optional): Provide a URL linking to the brochure of the respective F&I product, if available.
- Select Status: Choose Enabled to make the record available for future use or Disabled to restrict access.
- Managing Existing Records: Existing records are displayed in a table format. Use the Search Bar at the top of each column to filter records. Edit or delete records via the ellipsis menu on the right of each entry.

F&I Marketing Materials
Rebates
The Rebates tab enables users to configure and manage details of various rebates within the system. This includes adding, editing, viewing, and deleting rebate records. Rebates represent specific deal-related incentives, such as manufacturer rebates, loyalty rebates, graduate rebates, first-time buyer rebates, and others. The interface provides columns for Rebate Name, Rebate Code, Rebate Amount, and Status to ensure effective organization and management of rebate data.

Add New Rebates
To manage rebates:
- Add New Rebate: Click the “Add New Rebate” button to create a new rebate record.
- Input Rebate Name: Enter the name of the rebate to identify it in the system.
- Input Rebate Description: Provide a brief description of the rebate.
- Input Rebate Requirements (Optional): Provide a brief description of the rebate requirements.
- Input Rebate Code: Enter a unique identifier for the rebate for reference and tracking.
- Rebate Amount: Specify the monetary value of the rebate.
- Select Required Documents (Optional): Configure one or more required documents that customers must provide to claim the rebate.
- Select Finance Type(s): Choose one or more finance types (e.g., Lease, Finance) from the drop-down list to associate with the rebate.
- Select Payment Term: Assign the rebate to applicable payment terms (e.g., 12, 24, or 36 months), which are populated based on contract terms defined in Deal Setups.
- Select Applicable States: Specify one or more states where the rebate is valid, using the drop-down list.
- Select Status: Mark the rebate as Enabled to make it active or Disabled to restrict its availability.
- Upload Product Image: Drag and drop or browse to upload an image representing the rebate visually.
- Managing Existing Records: View existing rebate records in a table format. Use the Search Bar at the top of each column to filter entries. Edit or delete records using the ellipsis menu on the right side of each entry.

Rebates