Company Profile
The Company Profile section offers a user-friendly interface for managing your organization’s essential information. It features dedicated tabs for Profile, Address, Personalization, Language, Documents and Pricing enabling users to easily configure and update all relevant details in one centralized location. This section will guide you through each tab, ensuring a precise and complete setup of your Company Profile to meet your business requirements.

Company Profile
Profile
The Profile tab within the Company Profile section allows you to input and configure key information about your organization. This tab includes various fields for entering company details, selecting operational preferences and setting default options for efficient system operations. Below is a breakdown of each field available on the Profile tab:

Profile
- Company Name: Enter the official name of your company.
- Company Trading Name: Input the trading or business name if different from the official company name.
- Company Website: Provide the URL of your company’s official website.
- Email: Enter the primary email address for company correspondence.
- Correspondence Email: Input the dedicated email address for correspondence purposes.
- Tax ID: Input your company’s Tax Identification Number.
- Mileage Units: Select the unit of measurement for mileage (Miles or Kilometers) from the drop-down list.
- Default Search Radius: Choose a default search radius (e.g., 10 miles, 20 miles) based on the selected Mileage Unit.
- Initials: Input the company’s initials, typically used for identification in reports or internal documentation.
- Country: Select the country your company operates in from the drop-down list.
- Preferred Currency: Choose the currency most frequently used by your company.
- Default Currency: Select the default currency for your company’s transactions.
- Slug: Enter a unique identifier (slug) for your company, often used in URLs.
- Min Odometer for Prior Use: Input the minimum odometer reading required for previously used assets.
- Credit Decision Expiry Days: Enter the number of days after which a credit decision expires.
- Time Zone: Select the applicable time zone from the drop-down list.
- Daylight Saving Applicable: Select “Yes” or “No” to indicate whether daylight saving time is applicable.
- Contact Person Name: Input the name of the primary contact person for the company.
- Contact Person Phone: Enter the phone number of the contact person.
- Domain: Provide the company’s domain name (e.g., companyname.com).
- Minimum Duration of Current Address (Optional): Specify the minimum period required for the current address of a customer.
- Credit Response Cushion Time (Optional): Enter a time delay (in minutes) for capturing credit application responses. This optional field accepts a numeric value from 0 to 99, with a default set at ‘0’ (blank if not configured). Non-zero values will apply a delay accordingly.
Address
The Address tab allows you to manage your company’s address details, with options to record three different types of addresses: mailing address, invoice address and office address. Country-specific address templates are provided for each address type, including fields for address lines, city, state, ZIP code and country.

Address
Mailing Address:
The mailing address is the default and required address type, used for the company’s correspondence, such as sending postal mail.
Invoice Address:
This address is optional and is used specifically for invoicing purposes, such as where payments for goods or services are directed.
Office Address:
The office address is also optional and serves to specify the company’s physical location for business operations.
Personalization
The Personalization tab allows users to tailor the visual elements of the company’s profile to align with branding guidelines. This tab includes options to customize colors and upload brand-specific icons and logos, ensuring the company’s identity is reflected throughout the platform.

Personalization
- Primary Color: Set the company’s main brand color, which will be prominently featured in the profile and across interface elements.
- Secondary Color: Choose a complementary color to the primary, often used for accents and highlights to enhance the overall visual appeal.
- Favicon: Upload a small icon (favicon) that appears in the browser tab to make the company’s profile instantly recognizable.
- Logo: Upload the company’s logo, ensuring consistent brand representation on the profile and across the platform.
Language
The Language tab enables users to manage multilingual content for the company’s profile, allowing the profile to be accessible to a global audience. The tab features columns for Placeholders, English (as the default language) and additional columns for other supported languages. Users can translate the content from English into various languages, ensuring a seamless multilingual experience.

Language
- A search bar is provided at the top of each column to filter records based on search criteria.
- The Placeholder column lists text placeholders used throughout the company’s profile. These placeholders represent specific text elements that can be translated into different languages.
- The English (Default) column contains the content in English, which serves as the base language for translations. Users can input or edit the English content as necessary.
- Additional columns, such as Spanish, German, Chinese, etc., contain translated content corresponding to the English placeholders. Users can input translations to ensure the profile is accessible in various languages.
- An ellipsis menu on the right side of each record allows users to Edit or Delete the respective placeholder or content.
- Add New Placeholder allows users to add additional placeholders, providing flexibility for more text elements and broader multilingual support.
- Add New Language enables users to add a new language and choose whether it should be set as the default language for the company’s profile.
Documents
The Documents tab allows users to upload and manage documents relevant to the company. Documents are stored in the storage path defined under the user’s account settings.

Documents
To manage documents, follow these steps:
- Add New Document: Click on the Drag and drop file or browse to upload a document. Once the document is uploaded, the system automatically records the Uploaded By user and the Date/Time of upload, ensuring proper tracking and documentation.
- View Document: Click the Eye Sign to view the uploaded file. This provides a quick and easy way to access documents.
- Delete Document: To remove a document, select the ☒ option next to the document. Once deleted, the document will no longer be accessible.
Pricing
The Pricing tab is used to configure company-level pricing. Pricing can be set up based on either Standard Rates or Standard Charts, allowing flexibility in managing pricing strategies. This section streamlines the configuration of pricing, ensuring that rates and conditions are aligned with company policies.

Pricing
Standard Rates
The Standard Rates configuration allows for setting specific percentages for financing elements, such as down payments, residual values and customer rates. These configurations are applicable to available finance types, including Lease and Finance.

Pricing on Standard Rates
To manage pricing for Standard Rates, follow these steps:
- Select Standard Rates from Pricing: Choose Standard Rates from the Pricing drop-down menu.
- Input Down Payment (Optional): Enter the down payment percentage if applicable.
- Input Min Down Payment (Optional): Specify the minimum acceptable down payment percentage.
- Input Max Down Payment (Optional): Specify the maximum allowable down payment percentage.
- Input RV/Balloon (Optional): Enter the percentage for residual value or balloon payment, if required.
- Input Customer Rate (Optional): Enter the customer rate percentage to serve as the basis for financing calculations.
Standard Charts
The Standard Charts configuration allows pricing to be set based on pre-defined charts under the Charts menu option in Pricing Configurations. This approach offers flexibility by letting companies choose among various interest rate, commission, RV/Balloon and fee charts as pricing criteria.
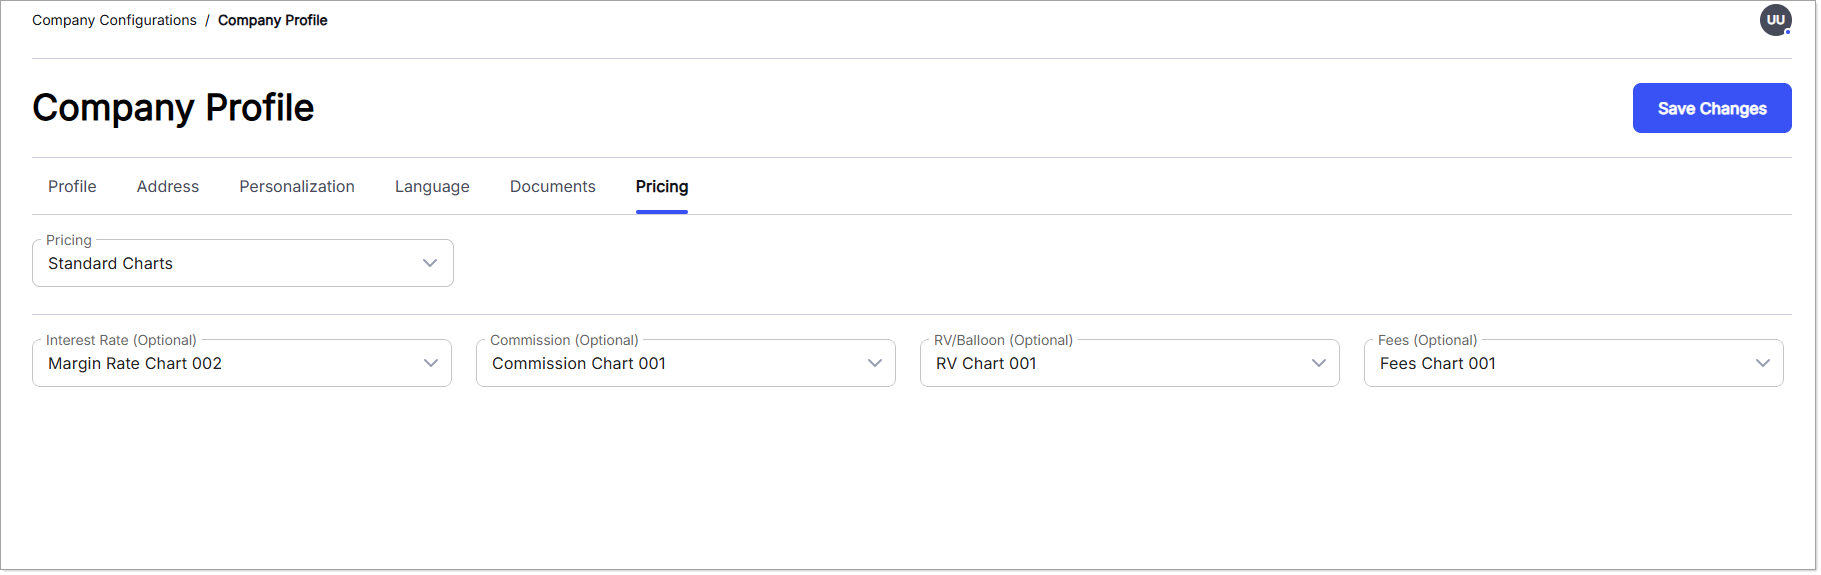
Pricing on Standard Charts
To manage pricing for Standard Charts, follow these steps:
- Select Standard Charts from Pricing: Choose Standard Charts from the Pricing drop-down list.
- Select Option Interest Rate (Optional): Select an interest rate chart from the drop-down list, which displays enabled interest rate charts configured under Charts in Pricing Configurations.
- Select Option Commission (Optional): Choose a commission chart from the drop-down list, populated with enabled commission charts under the Charts menu.
- Select Option RV/Balloon (Optional): Choose an RV/Balloon chart from the available options in the drop-down list of enabled charts under the Charts menu.
- Select Option Fees (Optional): Select a fees chart from the drop-down list of enabled fees charts under the Charts menu.
- Note: When determining pricing (rates or charts) during order creation, the system applies priority as follows:
- For Company: Pricing configured under the Pricing tab in the Company Profile.
- For Dealer: Preferences set in the Preferences tab of the Dealer Profile under Dealer Configurations.
- For Lender: The Pricing Program selected in the Lender Profile under Lender Configurations.