Create New Proposal
The Create New Proposal screen is designed to help users seamlessly create detailed and client-specific proposals.
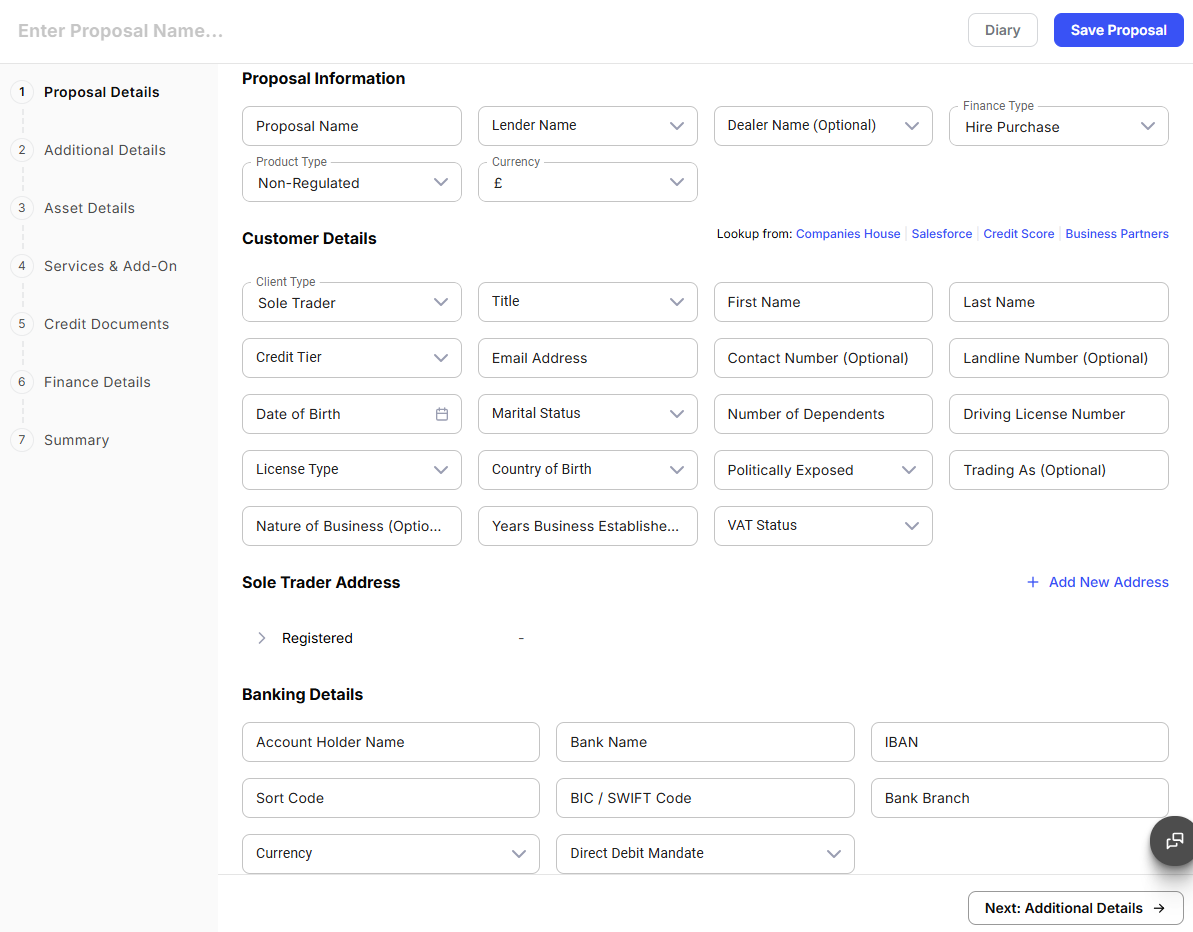
The screen includes a Header Section, where users can input a proposal name, save their progress, and utilize the diary feature for adding notes or reminders related to the proposal. Based on the side menu, the screen is then divided into seven tabs:
- Proposal Details: Where users input general client and proposal information.
- Additional Details: Where users provide the details of Business Partners.
- Asset Details: Which captures specifics about the assets being financed.
- Services & Add-On: Where users input the details of Services and Add-ons that they want to avail.
- Credit Documents: A dedicated area for uploading necessary supporting document.
- Finance Details: Where financial terms like loan amounts, interest rates, and payment schedules are defined
- Summary: Which provides a complete overview of the proposal for final review and validation.
This organized structure ensures a streamlined, accurate, and comprehensive proposal creation process.
Header Section
The Header Section provides users with essential tools to manage and organize proposal details efficiently.
In the Header Section:
- Users can input Proposal Name, ensuring the proposal is easily identifiable.
- The Save Proposal button allows users to securely save the proposal details at any stage, preserving their progress for further edits or submission.
- The Diary button enables users to view the proposal’s details and history, offering a comprehensive record of changes, updates, and notes associated with the proposal.
This section ensures quick access to key functionalities, supporting an organized and user-friendly workflow.
Proposal Details
The Proposal Details Tab is the cornerstone of crafting a detailed and structured proposal.
This tab is designed to capture comprehensive information about the proposal, the customer, and their associated contacts, ensuring accuracy and completeness in the initial stages of the lending process.
It is divided into four key sections Proposal Information, Customer Details, Sole Trader Address, and Banking Details to gather and organize critical data systematically.
- The Proposal Information section defines the proposal’s basic framework, including its name, financial parameters, and stakeholders such as the dealer and lender.
- The Customer Details section collects client-specific information, ranging from personal details to business profiles.
- The Sole Trader Address section facilitates the addition of key addresses.
- The Banking Details section ensures precise details are recorded, serving as a reliable reference for banking purposes.
This structured approach streamlines the proposal creation process and ensures consistency throughout.
Proposal Information Section
The Proposal Information section includes:
-
Proposal Name: Automatically populated with the proposal name entered earlier in the header section.
-
Dealer Name: Select the dealer associated with the proposal from the dropdown list.
-
Lender Name: Choose the appropriate lender for the financing arrangement from the dropdown list.
-
Finance Type: Choose the type of financial product (e.g., Hire Purchase, Finance Lease, Loan) from the dropdown list.
-
Product Type: Specify whether the proposal is Regulated or Unregulated by selecting from the dropdown list.
-
Currency: Select the currency in which the proposal will be financed from the dropdown list. This ensures that all financial values are calculated and displayed consistently in the selected currency.
Customer Details Section
Options are available to look up customer details before manual entry.
If the Client Type is Individual or Sole Trader, users can use the Lookup from Salesforce section to retrieve existing individual information. For other client types (e.g., Limited Company, Partnership, SME), users can either Look Up from Companies House or Look Up from Salesforce. Clicking any of these options opens a pop-up window where users can search for and select the appropriate customer details.
In the Customer Details section:
-
Client Type: Select the client type from the dropdown list, such as Limited Company, Individual, Partnership, or SME.
-
For Individual Client Type, input:
-
Title
-
First Name
-
Last Name
-
Credit Tier
-
Email Address
-
Contact Number
-
Landline Number
-
DOB
-
Marital Status
-
Number of Dependents
-
Driving License Number
-
License Type
-
Country of Birth
-
Politically Exposed Status
-
Trading As
-
Nature of Business
-
Years Business Established
-
VAT Status
-
-
For Partnership, SME, or Limited Company Client Types, input:
-
Company Name: Enter the official name of the company.
-
Credit Tier: Select option from Credit tier drop down list.
-
Company Registration Number: Provide the official registration number of the company.
-
Trading As: Specify the trading name if different from the company name.
-
Nature of Business: Describe the company’s primary business activity.
-
Years Business Established: Indicate how many years the company has been in operation.
-
The available fields mentioned above may differ based on the Client Type.
Partners/Directors Details Section
If the Client Type is not “Individual,” additional details about partners or directors must be provided:
Partner Details
-
Click Add New Partner to input:
-
Full Name: Enter the partner’s full name.
-
Email: Provide the partner’s email address.
-
Contact Number: Input the partner’s contact number.
-
Address: Record the partner’s address, including all required fields.
-
Role: Select the partner’s role (e.g., Contact Person, Partner) from the dropdown options.
-
Ellipsis Menu: Use the ellipsis menu to View/Edit or Delete the partner’s details.
-
Director Details
-
Click Add New Director to input:
-
Full Name: Enter the director’s full name.
-
Email: Provide the director’s email address.
-
Contact Number: Input the director’s contact number.
-
Address: Record the director’s address, including all required fields.
-
Role: Select the director’s role (e.g., Contact Person, Director) from the dropdown options.
-
Ellipsis Menu: Use the ellipsis menu to View/Edit or Delete the director’s details.
-
Address Section
-
Lookup by Post Code: Use the post code lookup feature to quickly select an address by entering the postal code.
-
Address Type: Select the appropriate address type from the dropdown list. Available options include Mailing Address, Invoice Address, Trading Address, and Registered Address.
-
Address Lines: Input the first and second lines of the address, including the street name and any additional location details.
-
City: Enter the city where the address is located.
-
Post Code: Input the postal code for the address.
-
County: Provide the county name corresponding to the address.
-
Add New Address: Click this option to add a new record for an additional address.
This detailed setup ensures that every proposal is supported by accurate and complete client information, facilitating a seamless and efficient proposal creation process.
Additional Details
Where users provide the details of Business Partners. Business Partner can either be a Guarantor or Co-Borrower.
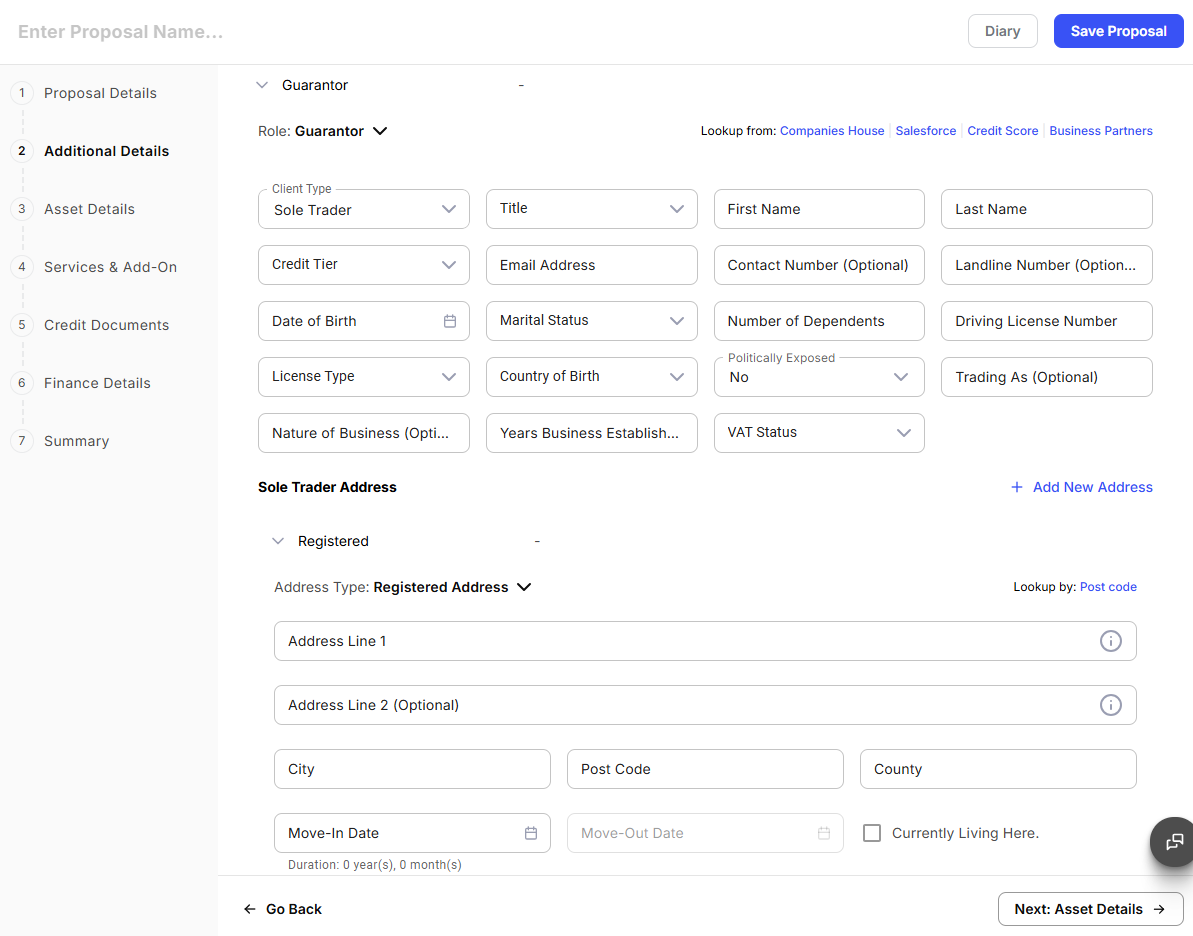
The fields displayed may vary depending on the selected role, client type, and your organization’s configuration.
Business Partner Information
The Business Partner section captures identity and contact details for the selected co-applicant or guarantor.
Fields Available
For the roles of Individual and Sole Traders:
-
Role: Displays the role of the individual associated with the proposal, such as Co-Applicant or Guarantor.
-
Client Type: Select the type of client, such as Sole Trader or other configured client types.
-
Title: Select the individual’s title.
-
First Name: Enter the individual’s first name.
-
Last Name: Enter the individual’s last name.
-
Credit Tier: Select the applicable credit tier.
-
Email Address: Enter the individual’s email address.
-
Contact Number: Enter the primary contact number.
-
Landline Number: Enter the landline number, if applicable.
-
Date of Birth: Select the individual’s date of birth.
-
Marital Status: Select the individual’s marital status.
-
Number of Dependents: Enter the number of dependents.
-
Driving License Number: Enter the driving licence number.
-
License Type: Select the licence type.
-
Country of Birth: Select the country of birth.
-
Politically Exposed: Specify whether the individual is considered a Politically Exposed Person (PEP).
-
Trading As: Enter the trading name, if applicable.
-
Nature of Business: Specify the nature of the business, if applicable.
-
Years Business Established: Enter the number of years the business has been established.
-
VAT Status: Select the applicable VAT registration status.
Depending on the selected client type, additional or fewer fields may be displayed.
For Client Type, other than Individual or Sole Trader input:
-
Company Name: Enter the official name of the company.
-
Credit Tier: Select option from Credit tier drop down list.
-
Company Registration Number: Provide the official registration number of the company.
-
Trading As: Specify the trading name if different from the company name.
-
Nature of Business: Describe the company’s primary business activity.
-
Years Business Established: Indicate how many years the company has been in operation.
The available fields mentioned above may differ based on the Client Type.
Address Information
The Address Information section records the individual’s registered or residential address. Four types of addresses can be added:
- Mailing Address
- Invoicing Address
- Registered Address
- Trading Address
Users can click Add New Address to record multiple addresses when required.
Fields Available
-
Address Type: Select the address type, such as Registered Address or other configured address types.
-
Address Line 1: Enter the primary address.
-
Address Line 2: Enter additional address information, if required.
-
City: Enter the city.
-
Post Code: Enter the postcode.
-
County: Enter the county or region.
-
Move-In Date: Select the date the individual moved into the property.
-
Move-Out Date: Select the date the individual moved out of the property, if applicable.
-
Currently Living Here: Select this option if the individual currently resides at the address.
If the postcode lookup feature is configured, users can click Post code to automatically retrieve address details.
Lookup Options
The Lookup links allow users to retrieve existing information from integrated third-party systems, reducing manual data entry.
Available lookup sources may include:
- Companies House
- Salesforce
- Credit Score
- Business Partners
The available lookup sources depend on your organization’s integrations and configuration.
Asset Details
The Asset Details Tab is designed to facilitate the addition and management of assets associated with a proposal.
Users can save one or more assets, which are then displayed in a table at the bottom of the screen for easy reference and management.
This tab enables users to specify asset categories, types, conditions, and additional details for each asset, ensuring a thorough and accurate record. It also provides functionality to view, edit, or delete saved assets through the asset table. This organized approach ensures that all assets linked to a proposal are recorded comprehensively and remain accessible.
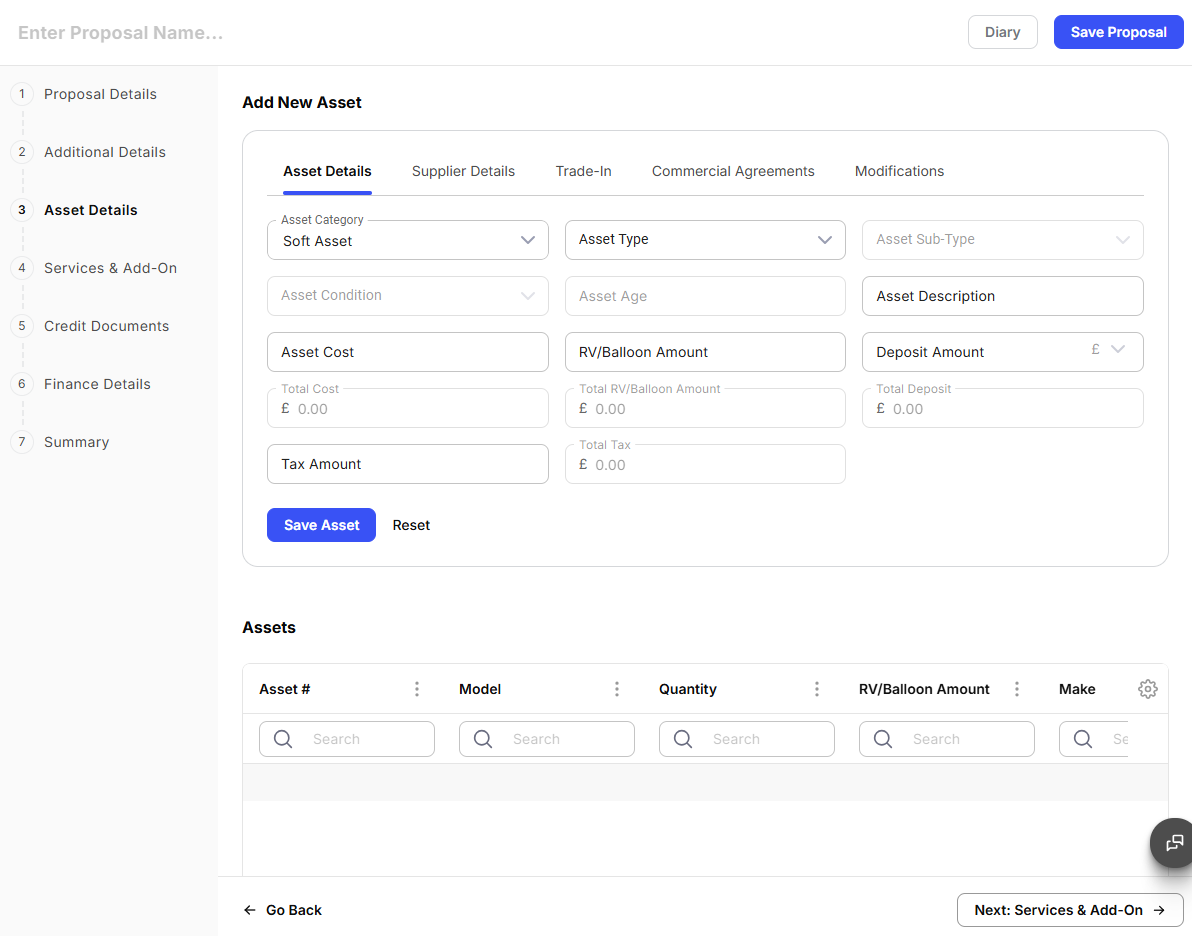
Asset Details is further divided into 4 tabs:
- Asset Details
- Supplier Details
- Trade-In
- Commercial Agreements
- Modifications
Asset Details
The Adding and Managing Asset Details section includes:
-
Asset Category: Select the category of the asset from the dropdown list. Options typically include Hard Asset (e.g., vehicles or equipment) or Soft Asset (e.g., software).
-
Asset Type: Choose the type of asset based on the selected category. For example, selecting Hard Asset may offer options like Vehicle or Equipment, while choosing Soft Asset may present options such as Software.
-
Asset Sub-Type: Select the sub-type of the asset. The available options depend on the chosen asset type. For instance, if Vehicle is chosen, sub-types could include Commercial Vehicle, Classic Vehicle, or Electric Vehicle.
-
Asset Condition: Specify the condition of the asset from the dropdown list. Common options for vehicles include New or Used.
-
Asset Age: If the asset is used, input its age in years to provide additional context.
-
Asset Cost: Enter the individual cost of the asset, reflecting its market or negotiated price.
-
RV/Balloon Input: Specify the residual value (RV) or balloon payment for the asset, if applicable. This represents the remaining value or final payment due at the end of the financing term for the specific asset.
-
Asset Description: Provide a detailed description of the asset, including any key characteristics, features, or specifications.
-
Quantity: Specify the number of units being purchased for this asset.
-
Total Cost: This field is automatically calculated by multiplying the entered Asset Cost by the Quantity, ensuring an accurate total.
-
Total RV/Balloon: This field is automatically calculated based on the sum of individual asset RV/Balloon values multiplied by their respective quantities, providing the aggregate RV/Balloon amount for all saved assets.
-
Reset: Click this button to clear all entered fields and reset the form before saving the asset details.
-
Save Asset: Click this button to save the entered asset details. Once saved, the asset will appear in the table below for review and further management.
Asset Table
The Asset Table section includes:
-
Saved Assets: All saved assets are displayed in a tabular format under key columns such as Asset Sub-Type, Asset Description, Supplier Name, Quantity, Asset Cost, and RV/Balloon.
-
Ellipsis Menu: Each row in the table includes an ellipsis menu with options to View/Edit the details of the selected asset or to Delete the asset from the table.
This streamlined process ensures that all assets relevant to a proposal are accurately documented, effectively managed, and easily accessible for updates or review.
Supplier Details
The Supplier Details tab captures information about the supplier associated with the asset being financed. Users can record the supplier’s business information, contact details, and registered address. The entered information is used throughout the proposal and can be retrieved from integrated systems where available.
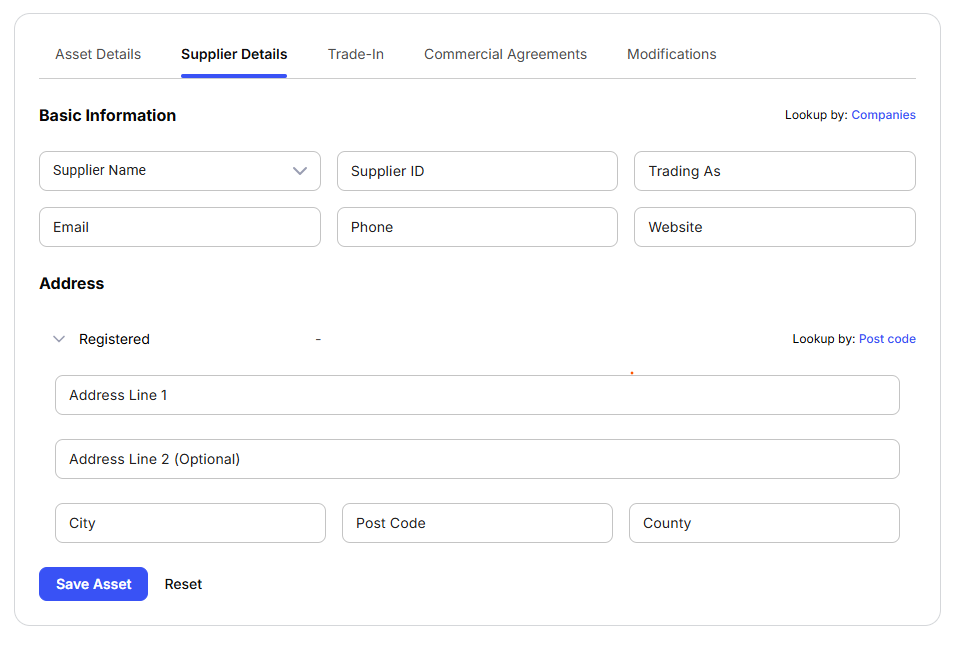
Supplier information can be entered manually or retrieved using the available lookup options, depending on your organization’s configuration.
Basic Information
The Basic Information section captures the supplier’s primary business and contact information.
Fields Available
-
Supplier Name: Select or enter the supplier’s name.
-
Supplier ID: Displays or enters the unique identifier assigned to the supplier.
-
Trading As: Enter the supplier’s trading name, if different from the registered business name.
-
Email: Enter the supplier’s email address.
-
Phone: Enter the supplier’s primary contact number.
-
Website: Enter the supplier’s website address.
If the Companies lookup is configured, supplier details can be automatically populated by selecting an existing supplier.
Address
The Address section records the supplier’s registered business address.
Fields Available
-
Address Type: Displays the address category, such as Registered.
-
Address Line 1: Enter the primary address.
-
Address Line 2: Enter additional address information, if required.
-
City: Enter the city.
-
Post Code: Enter the postcode.
-
County: Enter the county or region.
If the postcode lookup feature is available, click Post code to search for and populate the supplier’s address automatically.
Lookup Options
The Lookup links allow users to retrieve supplier information from integrated data sources, reducing manual data entry.
Available lookup sources may include:
- Companies
The available lookup sources depend on your organization’s integrations and configuration.
Actions
The following actions are available at the bottom of the tab:
-
Save Asset: Saves the supplier information entered for the asset.
-
Reset: Clears any unsaved changes made on the Supplier Details tab and restores the previous values.
Trade-In
For the Trade-in section, users are required to provide the details of the the Trade-in if any.
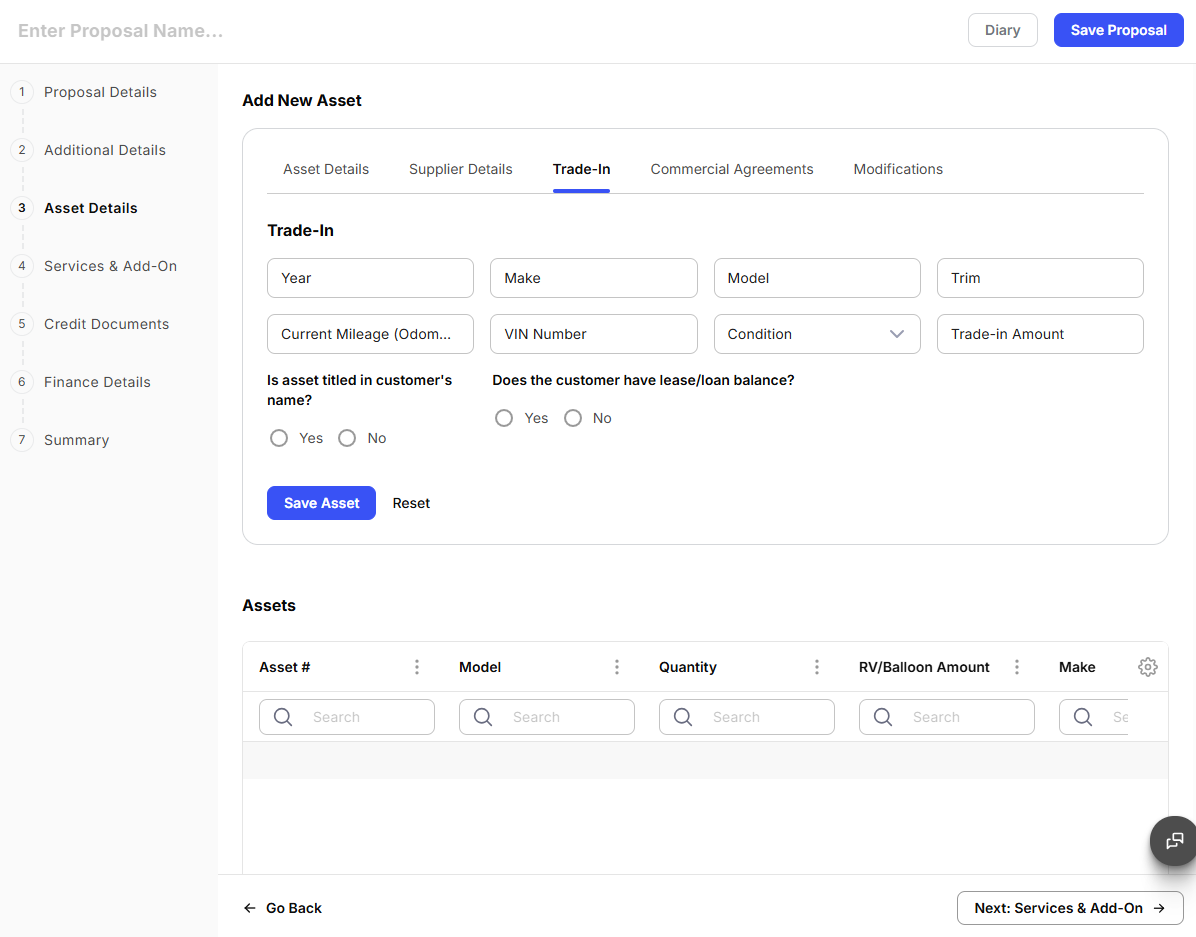
In the trade-in section, provide the following:
- Year
- Make
- Model
- Trim
- Current Mileage
- VIN Number
- Condition
- Trade-in Amount
You are also need to answer two questions:
- Is the asset titled in the customer’s name
- Does the customer have lease/loan balance?
Commercial Agreements
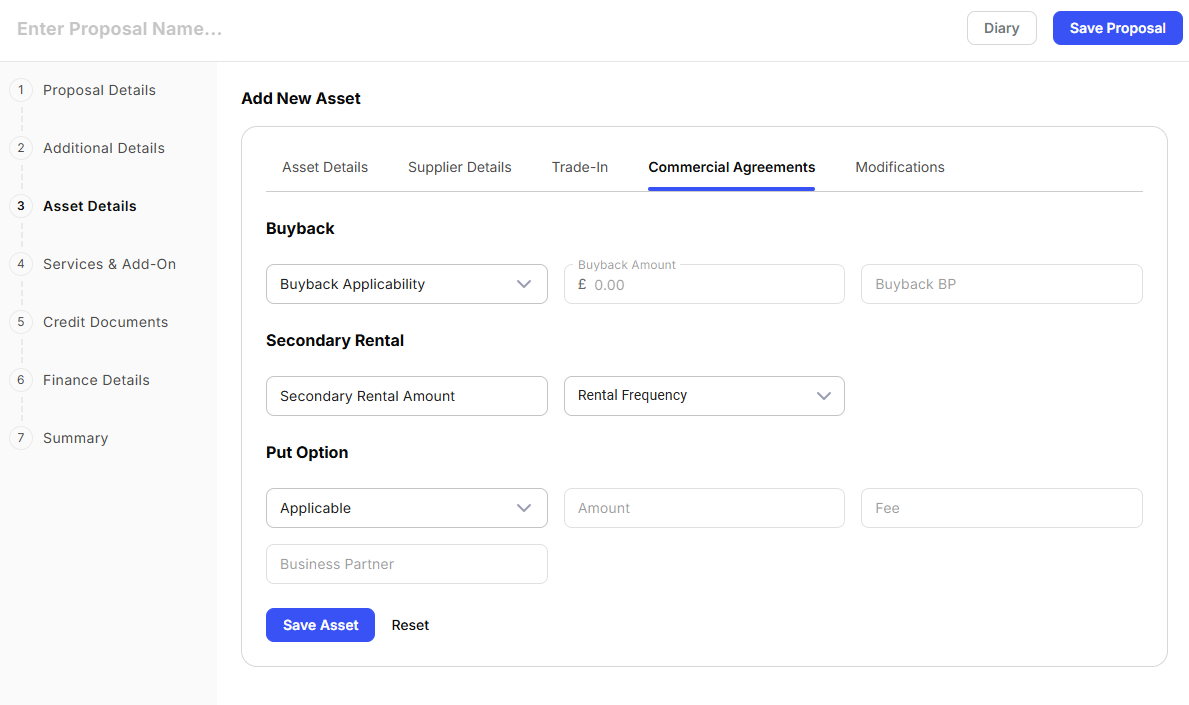
In the Commercial Agreements sections, specify the Buyback, Secondary Rental, and Put Options.
Modifications
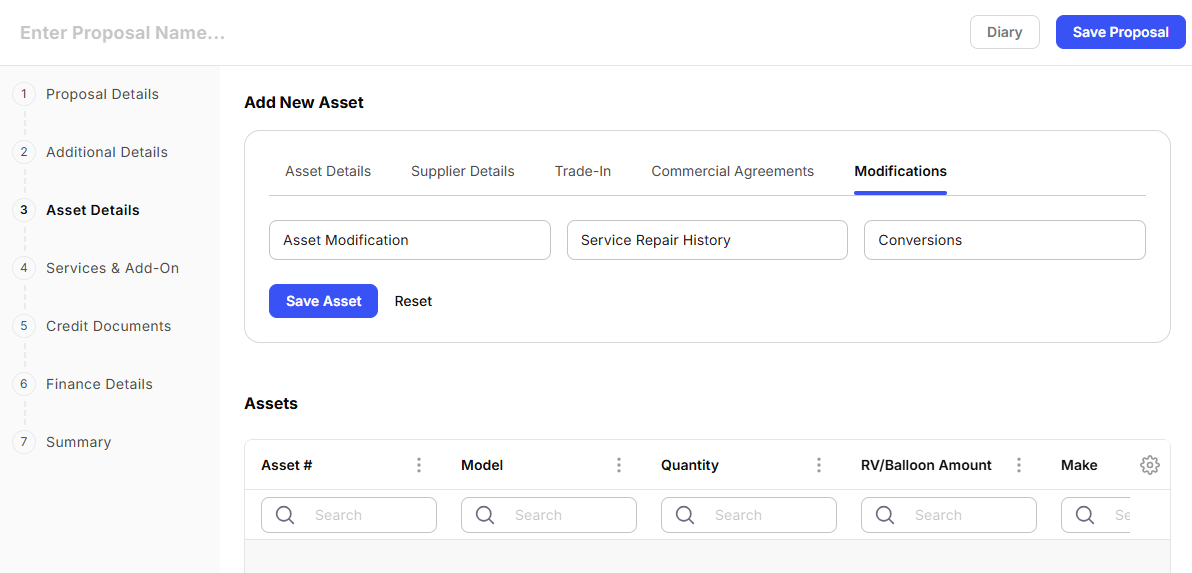
In the Modifications section, specify the Asset Modifications, Service Repair History, and Conversions made if any.
Services and Add-On
In services and add-ons section, specify the details of the services and any other form of add-on that you require.
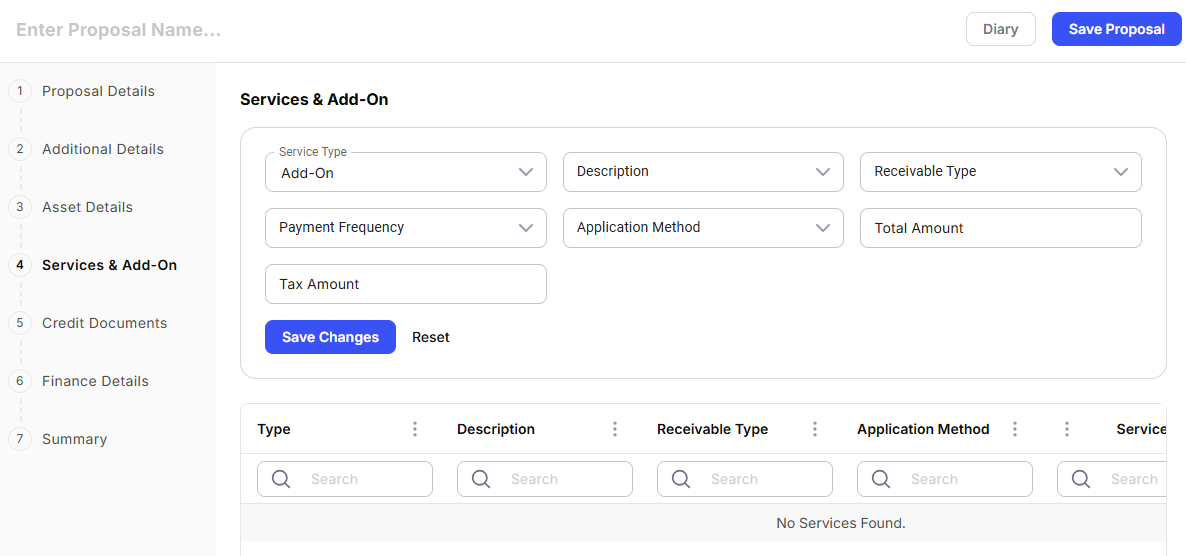
The details include:
- Service Type
- Description
- Receivables Type
- Payment Frequency
- Application Method
- Total Amount
- Tax Amount
Credit Documents
The Credit Documents Tab serves as a centralized hub for managing all the essential documents required for a proposal. This tab enables users to upload, view, and manage both mandatory and optional documentation, ensuring that all required files are well-organized and easily accessible.
It simplifies document tracking by providing clear visibility into the status of each file and allowing users to take necessary actions such as uploading, downloading, or deleting documents directly within the tab.
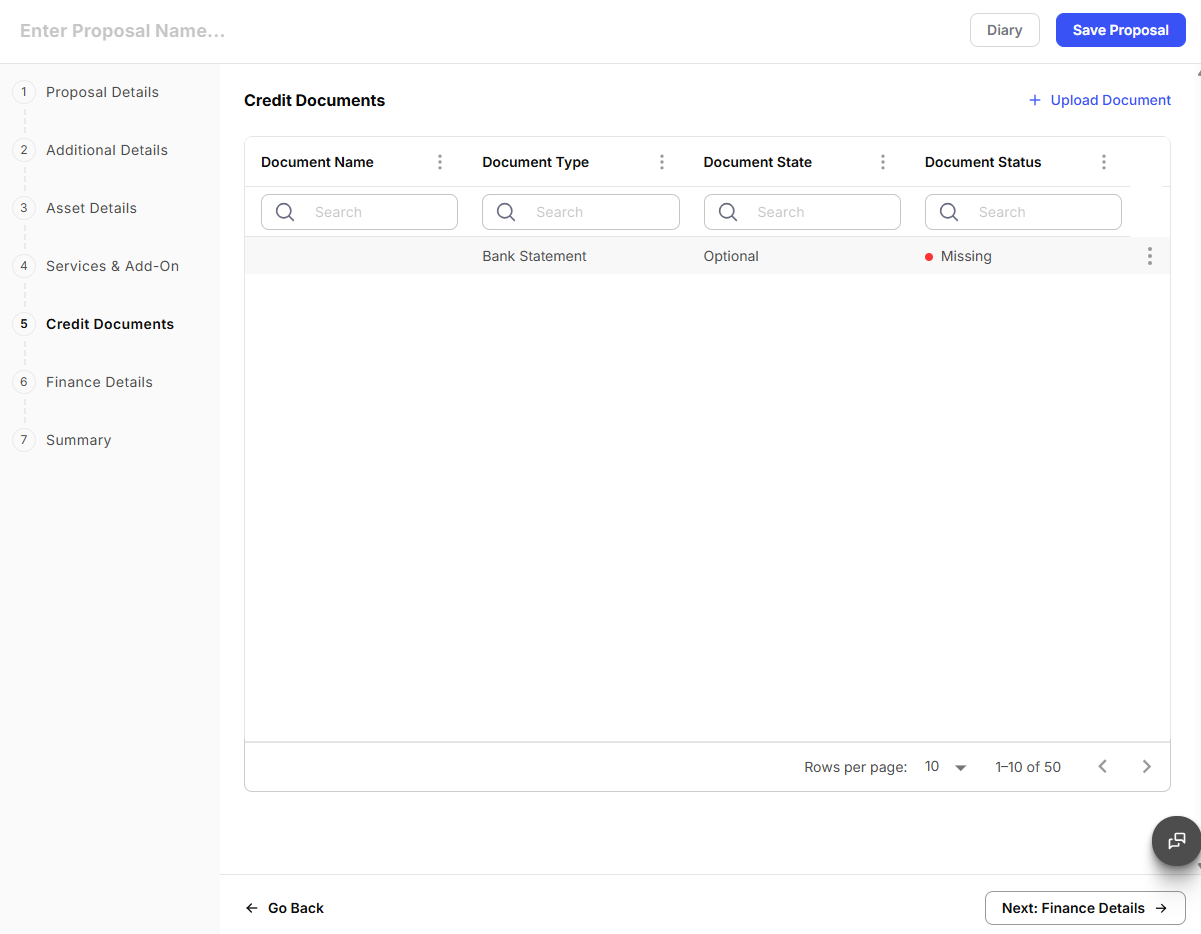
The Credit Documents tab includes:
-
Document Name: Displays the name of each uploaded document for easy identification.
-
Document Type: Specifies the category of the document, such as Financial Reports, Director’s Approval, Company Registration Certificate, Business Proposal, etc., helping users understand the document’s purpose.
-
Document State: Clearly indicates whether the document is mandatory or optional for the proposal, ensuring compliance with requirements.
-
Document Status: Reflects the current state of each document, such as missing or uploaded, allowing users to track what’s still required at a glance.
-
Ellipsis Menu on Each Row: Provides quick access to actions for individual documents, such as viewing, uploading, or re-uploading specific files directly from the document list.
Finance Details
The Finance Details Tab is designed to ensure accuracy and consistency in the financial calculations for a proposal, similar to the Create New Quotation window and is automatically populated with details from the Asset Details Tab. This streamlined approach minimizes manual entry errors and ensures that all relevant financial data aligns with the assets associated with the proposal.
However, users can review the pre-filled financial information and make edits or updates as needed. If any changes are made on this tab, the system will prompt the user for confirmation before finalizing the proposal. This confirmation process ensures that all modifications are captured correctly and that the financial details are thoroughly reviewed before the proposal is completed.
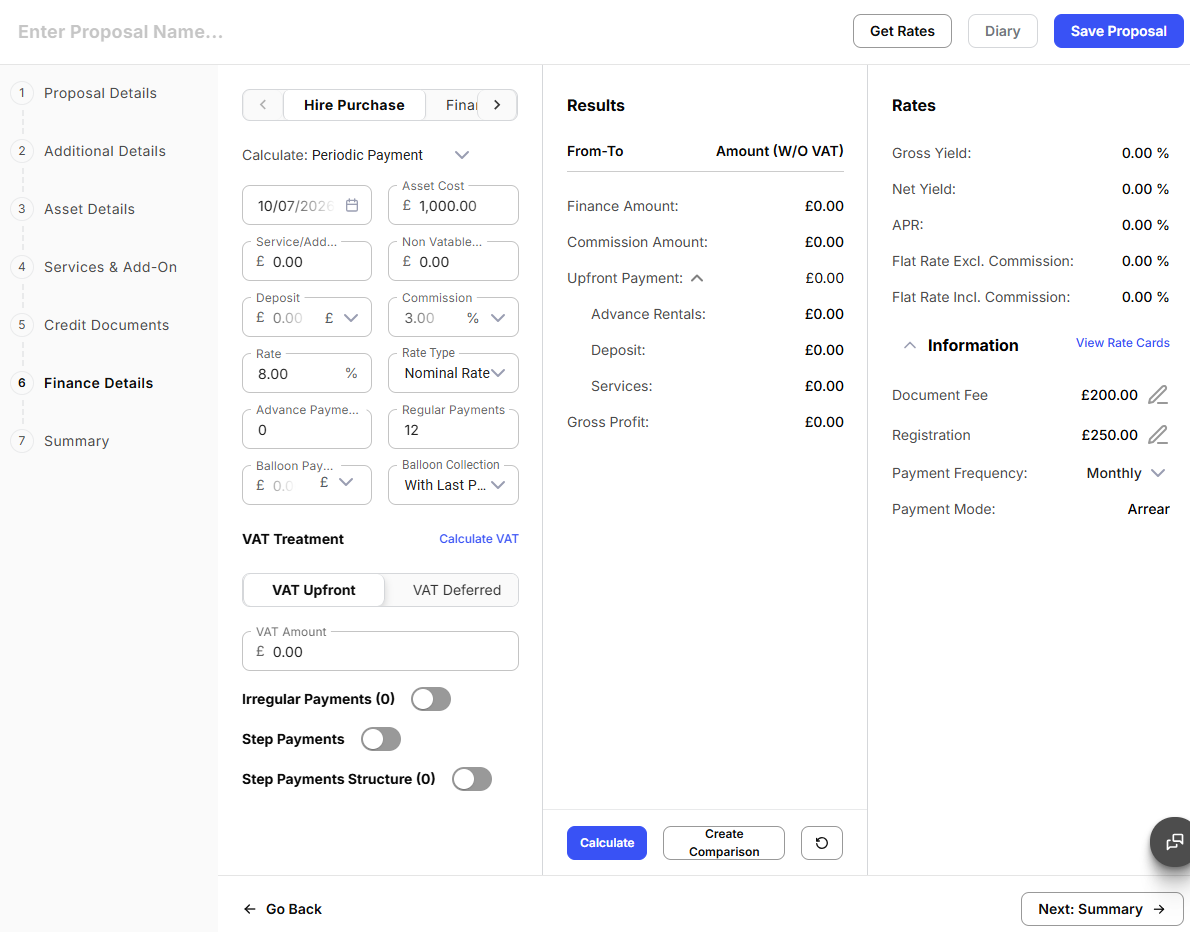
By following this structured process, the Finance Details Tab supports accurate financial management and eliminates the risk of oversight during proposal creation.
Summary
The Summary Tab provides a comprehensive overview of the entire proposal, consolidating all the information entered across the previous tabs. This tab serves as the final step before submitting the proposal, allowing users to review and confirm the accuracy and completeness of all entered details.
It offers a streamlined process for managing and finalizing the proposal, ensuring that no critical steps are overlooked.
The Summary Tab includes:
-
Save Proposal: Click this button to save the current proposal along with all its details. This allows users to return to the proposal later for further edits or review.
-
Diary: Access the proposal’s diary to view a log of all activities and changes made. This feature provides a clear record of the proposal’s history, helping users track modifications and updates.
-
Send to the Customer: Select this option to send the completed proposal directly to the customer, ensuring prompt communication and delivery of the proposal.
-
Submit Proposal: Finalize the proposal by submitting it for processing. This indicates that all details have been reviewed and are complete, ready for the next steps in the workflow.
This tab ensures that the proposal is thoroughly reviewed and that all necessary actions are taken before proceeding to the final stages of the process.
Download Proposal
After successfully submitting the proposal, a Congratulations window confirms the submission and displays the proposal details, including the assigned reference number for easy identification and tracking.
Users can click on the Download Proposal button to save a copy of the finalized proposal for their records or further use. All necessary details about the proposal are already displayed on the window, providing immediate access to the submitted information.
Additionally, users can add relevant remarks using the available Lender Justification Comment and Comments for Underwriter fields. These comments help communicate key information or context for proposal assessment, improving clarity and collaboration during the approval process.
This step ensures that users have easy access to the proposal document and all the related details for reference or further processing.