Leads Management
The Leads Management page provides a centralized location for creating, tracking, and managing leads throughout the sales lifecycle. Users can view lead details, monitor lead progress, filter records, and perform lead-related actions from a single interface. The page includes a searchable table that allows users to quickly locate specific leads and review important information such as lead status, source, contact details, product interest, and estimated value.
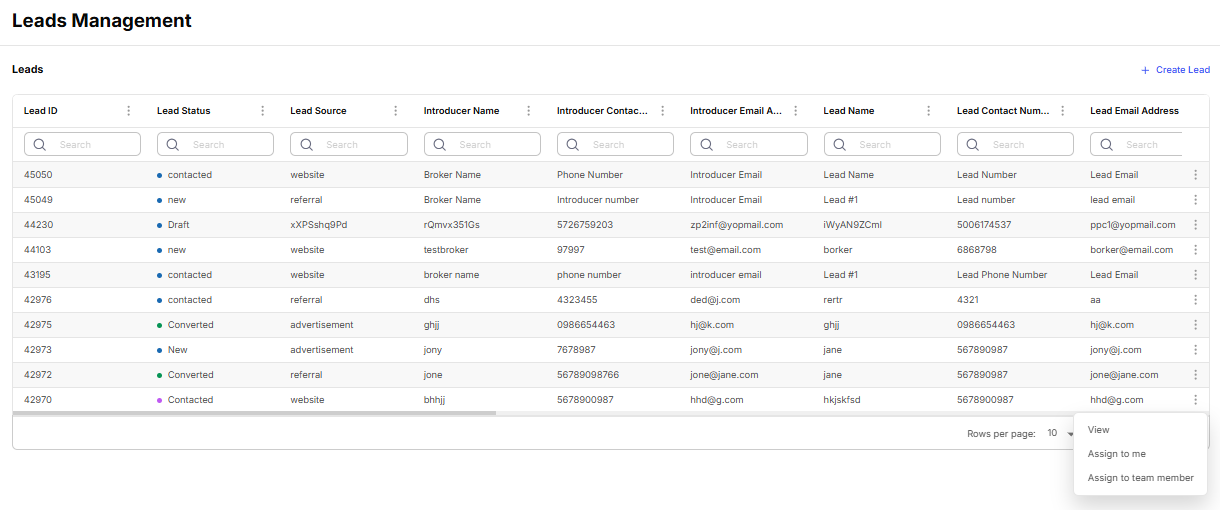
Click the three dot icon against a lead to View the lead, Assign to yourself, or Assign to team member.
Leads
The Leads table displays all leads available to the user. Each column includes a search field, allowing users to quickly filter and locate specific records. The table supports sorting, searching, and pagination, making it easier to manage large volumes of lead data.
Users can create a new lead by clicking the Create Lead button located in the top-right corner of the page.
Use the search boxes beneath each column heading to quickly filter leads based on specific criteria.
Columns Available
Lead Management Columns Available
The available columns may vary depending on the system configuration and user permissions.
-
Lead ID: Displays the unique identifier assigned to the lead.
-
Lead Status: Shows the current status of the lead, such as New, Contacted, Converted, Draft, or other configured statuses.
-
Lead Source: Indicates how the lead was acquired, such as Website, Referral, Advertisement, or other configured sources.
-
Introducer Name: Displays the name of the introducer, broker, or referrer associated with the lead.
-
Introducer Contact Number: Shows the contact number of the introducer or broker.
-
Introducer Email Address: Displays the email address of the introducer or broker.
-
Lead Name: Shows the name associated with the lead.
-
Lead Contact Number: Displays the primary contact number for the lead.
-
Lead Email Address: Shows the email address associated with the lead.
-
Lead Type: Indicates the classification of the lead, such as Business, Consumer, or other configured types.
-
Product of Interest: Displays the product or finance solution the lead is interested in.
-
Estimated Value: Shows the estimated value of the potential opportunity.
-
Preferred Communication: Indicates the lead’s preferred communication method, such as Email or Phone.
-
Preferred Contact Time: Displays the preferred time for contacting the lead.
The available columns may differ depending on the configuration.
Create Lead
Users can create a new lead by clicking the Create Lead button located in the top-right corner of the Lead Management page. Clicking this button opens a slide-out panel where lead details can be entered.
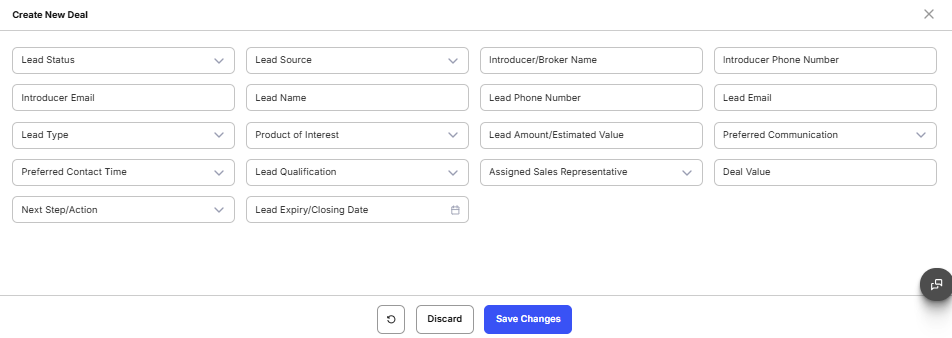
After all required information has been entered, click Save Changes to create the lead. To exit without saving, click Discard.
Fields Available
Create Lead Fields Available
-
Lead Status: Select the current status for the lead.
-
Lead Source: Select the source from which the lead originated.
-
Introducer/Broker Name: Enter the name of the introducer, broker, or referrer associated with the lead.
-
Introducer Phone Number: Enter the contact number of the introducer or broker.
-
Introducer Email: Enter the email address of the introducer or broker.
-
Lead Name: Enter the name of the lead.
-
Lead Phone Number: Enter the primary contact number of the lead.
-
Lead Email: Enter the email address of the lead.
-
Lead Type: Select the appropriate lead classification.
-
Product of Interest: Select the product or service the lead is interested in.
-
Lead Amount/Estimated Value: Enter the estimated value of the opportunity.
-
Preferred Communication: Select the lead’s preferred communication method.
-
Preferred Contact Time: Select the preferred time to contact the lead.
-
Lead Qualification: Specify the qualification status or quality of the lead.
-
Assigned Sales Representative: Select the user responsible for managing the lead.
-
Deal Value: Enter the anticipated value of the potential deal.
-
Next Step/Action: Specify the next planned activity or action for the lead.
-
Lead Expiry/Closing Date: Select the expected expiry or closing date for the lead opportunity.
Some fields may be mandatory depending on your organization’s configuration and lead management workflow.